
A fresh and clean resin surface is a must for a beautiful new faceup for your doll. You know this if you paint your own dolls, but even if you send them to a professional artist, you may want to clean the head yourself. Many artists prefer to receive a clean doll. By cleaning it yourself, you will see if your head has hidden flaws or modifications. There are strong opinions in the doll community about which solvents should and should not be used – if you’re concerned, you may want to clean your dolls yourself or discuss it with your painter. The cleaning solvents are highly flammable and they can have bad effects on your health, so you may decide to leave the task to a pro, but you should still know what is involved. If you’re new to customizing BJDs, I think this tutorial will be helpful.
First Things First…
Today, I am sharing my cleaning process on two difficult-to-clean heads. I am not a chemist or safety expert, so I invite you to learn from my experience but I am not responsible for any negative outcomes you may have based on my tutorial. I read as much as I can on this topic because I highly value my dolls, but I am still learning too. The solvents I use are flammable, they can be absorbed into the skin, they have fumes – work in a ventilated area and wear gloves if your hands will touch the solvents. Consider your own sensitivities and personal health issues before starting this project.
Why I like Isopropyl Alcohol…
I use Rubbing Alcohol that is a 91% Isopropyl solution. Alcohol commonly used for home remedies is 70% isopropyl. You can use that (and extra elbow grease), but make a trip to the drugstore and get some 91%. This concentration is used for many high-tech cleaning purposes because it evaporates very quickly without leaving residue. Use a lot of cotton balls and swabs, and you can remove just about any faceup with only isopropyl alcohol. My experience with alcohol has been excellent but you should still TEST on your resin before wiping a face. The head-cap is a great place to test– just wipe 1/2 of it with the alcohol and observe for changes. Never soak resin in any solvent.
- It dissolves Mister Super Clear sealant very well,
- It dissolves most of the various types of eye putty residue,
- It evaporates quickly so it is unlikely to cause problems (like softening the resin) in the deep areas of the sculpt,
- It will usually dissolve mystery sealants and glosses with some extra effort,
- It isn’t as hazardous to people as many other solvents.
Alcohol is flammable and it has fumes. A lot of exposure might be hazardous for people but alcohol is an ingredient in many products we use routinely.
Windsor & Newton Brush Cleaner and Restorer (W&N)—where I go when isopropyl can’t do the job.
People love this stuff. I’ve also had good luck with it but I only dab it on the tough areas after I’ve done my best with isopropyl alcohol. I’m still cautious with W&N even though it has a good reputation—I do not use it for general cleaning. It contains ethanol (which is a type of alcohol) in an oily liquid. W&N can be more effective than isopropyl alcohol because the oil inhibits speedy evaporation and can hold the liquid in place, giving it more time to work. The oil may also help break some bonds in the old paint and sealant. All oily residue must be completely removed before the head can be coated with Mister Super Clear or other sealant. Resin is porous, so that can be a challenge. Customizers haven’t been using this product for a long time so I’m still cautious with it – I TEST it in an inconspicuous area for changes to the resin and I use it sparingly so I’ll have less oil to clean away.
If I’ve done my best with isopropyl alcohol and spot treated with the W&N but I still have some stubborn paint, that is when I spot treat with acetone. This situation is usually when there is an unusual sealant or gloss, or the resin is very rough and porous. Fortunately, those situations are rare.
Acetone… A Dirty Little Secret
In the resin doll community, acetone is extremely controversial. When resin BJDs first became popular, just about everyone used acetone. Over time, people started to document serious damage caused by using acetone. I sometimes use acetone but you should decide if you are comfortable with it.
The worst cases of acetone damage resulted from soaking a head in acetone – never soak resin in any solvent. Also, solvents can soften the resin, so some of the damage occurred when the resin was in a weakened state – especially in areas like the eyes where the resin is thin and more delicate. There are many new resin formulas, so it’s important to be cautious. I pre-test for subtle changes in the color and texture of the resin—this is the sort of damage that you would be most likely to experience if your resin shouldn’t touch acetone. This is how I use acetone and I have not had any resin damage:
- TEST in an inconspicuous place (see the tutorial for how to test).
- Use acetone only as a last resort on paint that just won’t budge.
- Conservatively spot treat the stubborn paint area with a cotton swab dipped in the acetone.
- Do not allow the acetone to pool in depressions in the sculpt.
- Acetone can be absorbed through the skin – be safe.
Here are some step-by-step photos of two heads that were a little challenging to clean:

These are the heads to be cleaned. The Zaoll Luv faceup is still nice but a bit worn. I bought the doll used and I envision a new personality for her. The Narae faceup has gotten a chalky look to it. It is obscuring the natural color of the resin so she is getting a new look. Luv is urethane resin in a normal tone and Narae is tan French resin. She is several years old. Translucent resins and tan resins are more delicate – it is easier to damage the color and texture so I am extra cautious with her.
Let’s start with Luv.

With lots of cotton balls and isopropyl alcohol, the old sealant gets gummy as it dissolves and wipes away nicely. The eye putty residue wipes away and the glue on the lashes will come off too.

Use lots of swabs to get into the eye creases, the lip line, and the ears.

I’m disappointed that I wasn’t able to get all the paint and sealant off with the isopropyl alcohol. Artist faces are generally more difficult to remove than factory faces. So, now I’ll do a test on the resin and see if it is safe to use Windsor & Newton Brush Cleaner and Restorer or acetone. If there are bad reactions, I’ll have to go back to the isopropyl alcohol and try a little harder.

Normally, I test on the inside of the headcap but this one has lots of incised writing so I’m testing on the back of the head. Using a pencil, I make a circle and label the solvent I’m testing. In this instance, I’m testing both “Windsor & Newton Brush Cleaner and Restorer” and acetone. I paint each solvent inside the circles and let them sit for several minutes (leave them for about twice as long as you plan to leave them on the doll when doing an actual cleaning). Since the acetone evaporates so fast, I have to reapply it to the circle several times. Then, I wipe away the W&N with a wet swab and smidge of soap. I leave the headcap alone overnight or go away for a few hours. I want to see if the solvents changed the color or texture of the resin.
When I return, I clean the area with soapy water and dry it. I look for any hint of change to the resin. Any change would probably be very subtle so look carefully. You can’t assume that once a test goes well for a certain type of resin, that you can always use that solvent safely on resin from the same company. Resin formulas are always changing so test every doll.
Neither solvent changed this particular resin at all.

The W&N worked great on the stubborn areas. No need for acetone.

Some soap and a Magic Eraser sponge are great for a final cleaning. Rinse very well. After rinsing with tap water, I rinse with distilled water in a spray bottle. There may be things in the tap water that would leave a residue. Let the head air-dry overnight. If you spray with sealant when there is any remaining water, the sealant will be cloudy or flakey and may peal away.

Now, lets see how Narae is coming along… I’ve cleaned her with the isopropyl alcohol but there is a lot of paint that doesn’t want to budge.
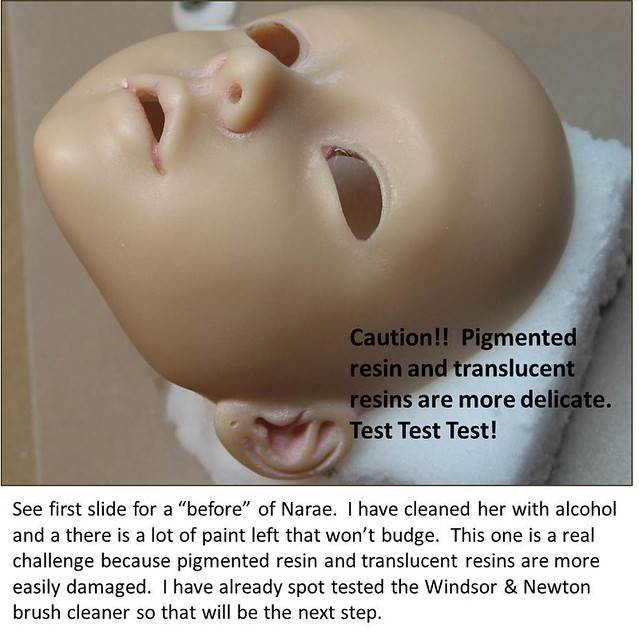
The old paint doesn’t want to come away from the deep areas of the sculpt. It is especially resistant where the resin is rougher. I already tested the W&N and the resin was unchanged so I’ll use it and hope that does the job.

There is still old paint in the ears, and the tear duct area.

This resin was unchanged by the acetone after my test. Tan and translucent resins require extra caution so I’m happy to see that it tolerates the acetone. This is an older Narae and everything about the resin looks and feels great. As you can see from the photo, I am gently dabbing only the problem area with a swab.

This head may have been sealed with an artist product rather than Mister Super Clear or Zoukeimura Spray. It was very difficult to remove. MSC has changed formulas over time so it may be that the older version of the product was harder to dissolve. Sometimes, it has been nearly impossible for artists to get MSC and Zoukeimura Spray so they used other products. In any case, it eventually came away even though it took a long time and I had to use stronger solvents than I wanted. Whatever the sealant was, it protected the head very nicely. The resin color is lovely even though it is an older doll.

The next time you see these two gals, they’ll have new faces.
If you would like more information, I highly recommend this thread on the Den Of Angels BJD Forum: Link: “Cleaning Solutions / Tested Methods.” Unfortunately, it is only accessible by forum members. If you can access it, there is a lot of excellent information about safety, effectiveness, and a lot of helpful member Q&A.
UPDATE on 6/21/13: Here are pictures of these 2 girls with their new faces:


Pingback: Inspiration’s Top 5, Week 2 | Color Haunt