
This is “Jubilee,” my Izannah Walker inspired doll. I modified a pattern created by Dixie Redmond and I used many tools and materials from Gail Wilson Designs. I highly recommend both artist companies. Please check out my last post for pictures and history of Izannah Walker dolls, plus information on the resources I used to make my doll (link).
Authentic Izannah Walker dolls had painted hair – it is their most recognized identifying feature. I found only one picture of a dark skinned vintage doll and she has a wig of lamb’s wool. I like to make wigs so this doll inspired me to make a wigged Izannah-type doll with lovely African features instead of the traditional pale doll.
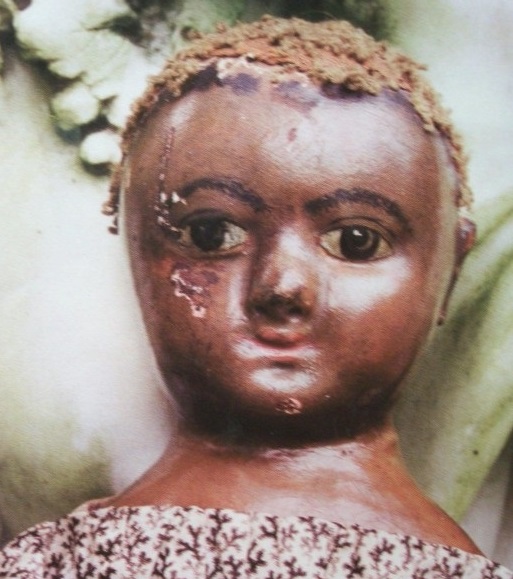
Rare black Izannah Walker doll from the collection of Richard Wright.
I started with Dixie Redmond’s pattern and elongated the arms and legs to make a taller doll. I also wanted to experiment with jointing so I added ball joints at the shoulders, elbows, and knees. The original dolls often had some sort of stick inside the neck and torso for reinforcement. I used PVC pipe for this and for a channel for the shoulder ball joints. This photo shows the PVC with the head and torso and Dixie’s instructions in the background.

The head and torso (before stuffing) with PVC reinforcement. Dixie’s instructions are in the background.
This photo shows the head and torso with a coat of gesso and a layer of air dry clay on the head and shoulders. This is the foundation for the fun part: the head sculpting.

The head and torso with a coat of gesso and a layer of air dry clay on the head and shoulders.
She is beginning to look like the girl I envision. The surfaces are still rough and there are some symmetry issues. Izannah Walker dolls are considered “primitives” and were handmade, so I don’t really have to strive for perfection in my sculpting. I don’t want her to be asymmetrical enough to look odd or off kilter though. I use a mirror, calipers, and paper templates to check shape and spacing.

Rough sculpt of the head.
 When sculpting or painting, I hang inspiration pictures all around my work area. I could use tools and try to make my sculpt match the model, but I usually just let the images “seep” in and I find the photos are reflected in my work. For Jubilee, I edited pictures of the actress, Quvenzhané Wallis. I had to stretch the images to be quite a bit wider for my doll’s round head shape and I added some reference gridlines.
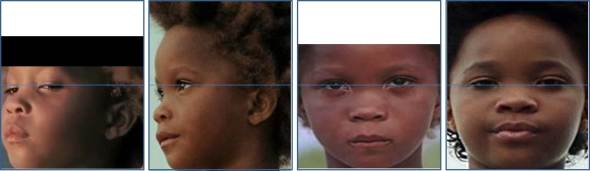
Montage of inspiration pictures (modified) of the actress Quvenzhané Wallis.
In this photo, the head sculpt is smoothed and ready for a fabric surface covering. The arm and leg parts are all stuffed and coated with gesso. I stuffed the body parts very tightly with a combination of wool roving and polyester stuffing.

Ready to be painted and assembled.
The head is now covered with a layer of fabric. This is an optional step but it makes the doll resemble the vintage doll heads that were made from molded stockinette. It also makes the doll very durable and I don’t want this doll to be fragile. I selected this fabric because it is extremely pliable. It has more weave texture than I would have liked, but it worked well over these features which are more prominent than those on an authentic Izannah Walker doll.

The head and shoulders covered in fabric.
I didn’t do the ears quite like an authentic Izannah Walker. Mine are more stylized rather than realistic but I like them this way. I used tape to get them placed evenly on each side.

Attaching the ears.
Next is the painting. I used acrylic craft paint in a bottle for the base brown. Here are the arms and legs hanging to dry. In this photo, you can see that I made Jubilee’s feet larger and a bit more detailed. I was able to shape the fingers with a gentle curve when the gesso was wet.

Arms and legs drying.
I painted the face with a mix of Izannah style and elements of my own painting style. I used Golden acrylics. When her wig is attached, I’ll paint some little hair curls around her face.

Painting the facial features.
Jubilee’s wig is braided wool roving. She’s a very patient client.

The wool has been glued to the head and the braids are started.
Pulling the style together:

The braids are finished.
Jubilee’s arms and legs are now attached and I painted the little curls around her face. I coated her with a layer of microcrystalline wax which gives her a protective surface for safer handling. For photography, her old matte surface was much better though. Many people antique the surface of their reproduction Izannah dolls with paint and craquelure techniques but I opted not to do this on Jubilee. I’m not trying to make her seem vintage.

The doll is finished and she’s ready for clothing.
This is my rough sketch for Jubilee’s outfit with fabric swatches. I drafted the pattern by draping the doll with tissue paper and masking tape.

The sketch, swatches, and patterns for the outfit.
The finished garments:

Jubilee’s outfit.
Even though I’m not trying to make Jubilee seem vintage, I did tea-stain the clothes with a strong brew of coffee and tea to eliminate the over-bright look. It is always difficult to soak a pristine garment with this muck but I love the antique effect.

Garments drying with tea staining.
This picture shows Jubilee’s feet and the form for her boots.

Jubilee’s feet with her boot form.
To make a shoe or boot form for a cloth doll, make a 3rd foot, stuff it, and coat it with gesso. Cut a sole from cardboard. I made the sole symmetrical so that I could use the same form for both feet. Size the sole big enough to get the foot in and out easily with socks. Glue the sole to the stuffed foot and then layer air dry clay over it until you have the shape of the boot you want. Rub the dry form with wax. You can now use this form to make your boot or shoe pattern.
Here is my boot form with the cloth pattern pieces.

Boot form with pattern pieces.
The boots are almost finished. The acrylic paint looks like leather.

Boots nearly finished.
Dixie Redmond also provides a mini-Izannah pattern that I modified to make a doll for Jubilee. My modified doll has a wooden ball head instead of a stuffed head.

A doll for the doll.
Here is “Zannah,” the finished mini-doll:

Jubilee’s little doll, “Zannah.”
And finally, the finished “Jubilee:”


In Victorian times, coral was believed to promote good health so you will often see young girls wearing coral necklaces in old photos.


All done…


Robbin… You are so amazing ! Reading up on this Izannah Walker doll project, and in awe !! It is so lovely. I have checked out your work before, but am finding even more to peruse. I want to move and live next door to you ! Also, I am very excited to see my new girl on the page of your website ! I am so looking forward to dressing her. You did such a cool job on her face-up ! Hugs…. Julienne
You’re so kind! The house next door is for sale coincidentally 🙂 I hope you have fun with Erica. She is a really cool doll. Big Hugs!
Such a beautiful doll! I was looking up Izannah Walker dolls and happened to pass by. I am completely blown away by your skills and work-lady-ship! 🙂
Pingback: Felicity! | Mad Wife In The Attic